Creating a connection between your Lenovo Laptop and Your Wireless Printer.
In preparation, please make sure the printer is on – the power button in the lower right side should be glowing white.
First Set of Instructions
Step 1: Check to see if a connection has been established.
Check to see if a connection has already been established for you. I usually open Word and go to the print menu. Look for the drop down menu in the “Printer” section. Look for a small image that looks like your black printer. Usually the name of the printer has your classroom number on it. Select it and try printing. If it works, congratulations you are done. If not, go onto step 2.
Step 2: Acquire the printer’s IP address
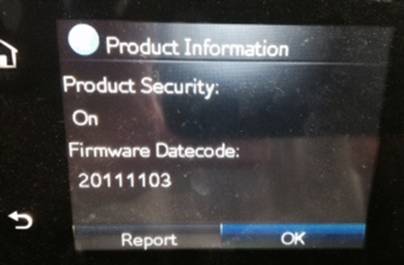
Look at the small 4 inch monitor on the printer (you may have to touch the screen to wake it up). Click on the blue button with the white “i” in its center. This is what the screen should look like:
Notice how “ok” is highlighted in blue? Select “Report” and you will hear the printer come alive and it will print a “Configuration Report.”
The point is to acquire the address for the printer. Once you have this address, you will be able to tell your Lenovo where the printer is.
Look on the right hand column for “Product Settings.” Now look for the “IPv4 Address.” The nine digit number that follows is the printer’s address.
(Note: if there isn’t an IP number present, then turn off the printer and turn it back on…then check again.)
Step #3: Provide IP Address to Lenovo
Log into your Lenovo. In the Search tool, enter: “Printer” then select “Devices & Printers.”
The “Devices and Printer” window will open. Select “Add a Printer” at the top of the window.
Another window will appear showing all visible printers. Select, “The printer that I want isn’t listed.”
Select, “Add a printer using a TCP/IP address or hostname. “Next.”
In the window that appears, enter the IP address you received from the printer on the line following, “Hostname or IP address.” “Next”
The next window that appears should say that “You’ve successfully added ‘the name of the printer’.” You can type any name you want in the field for the printer.
You should see an image of your printer in the “Devices and Printers” window that pops up.
Default Printer: the printer with the green check is the default printer. If you want to change the default printer, right click on the printer and select “Set as default printer.”
Step #4: Sample print to see that connection has been established.
Create a junk document in Word and select print.
Second Set of Instructions
Open the Search Tool.
Type: Printer.
Select: Devices and Printer
Look toward the top of the window. Select “Add a Printer.”
Select: “The printer that I want is not listed.”
Click on: “Select a shared printer by name” – Then depending upon which campus you are on, enter one of the following:
For SHHS: \\shhs-print1\
For RLS: \\rls-print1\
For Primary: \\shps-prit1\
The moment you enter it in, you should immediately see a list of the printer on that campus. Look for the entry that has your classroom number on it. Select it. Then, Next, Next, Finish.